| Package Data | |
|---|---|
| Maintainer Username: | dusterio |
| Maintainer Contact: | denis@mysenko.com (Denis Mysenko) |
| Package Create Date: | 2016-06-01 |
| Package Last Update: | 2025-03-27 |
| Language: | PHP |
| License: | MIT |
| Last Refreshed: | 2026-01-28 03:15:28 |
| Package Statistics | |
|---|---|
| Total Downloads: | 5,615,887 |
| Monthly Downloads: | 41,785 |
| Daily Downloads: | 1,811 |
| Total Stars: | 310 |
| Total Watchers: | 14 |
| Total Forks: | 59 |
| Total Open Issues: | 1 |
Run Laravel (or Lumen) tasks and queue listeners inside of AWS Elastic Beanstalk workers
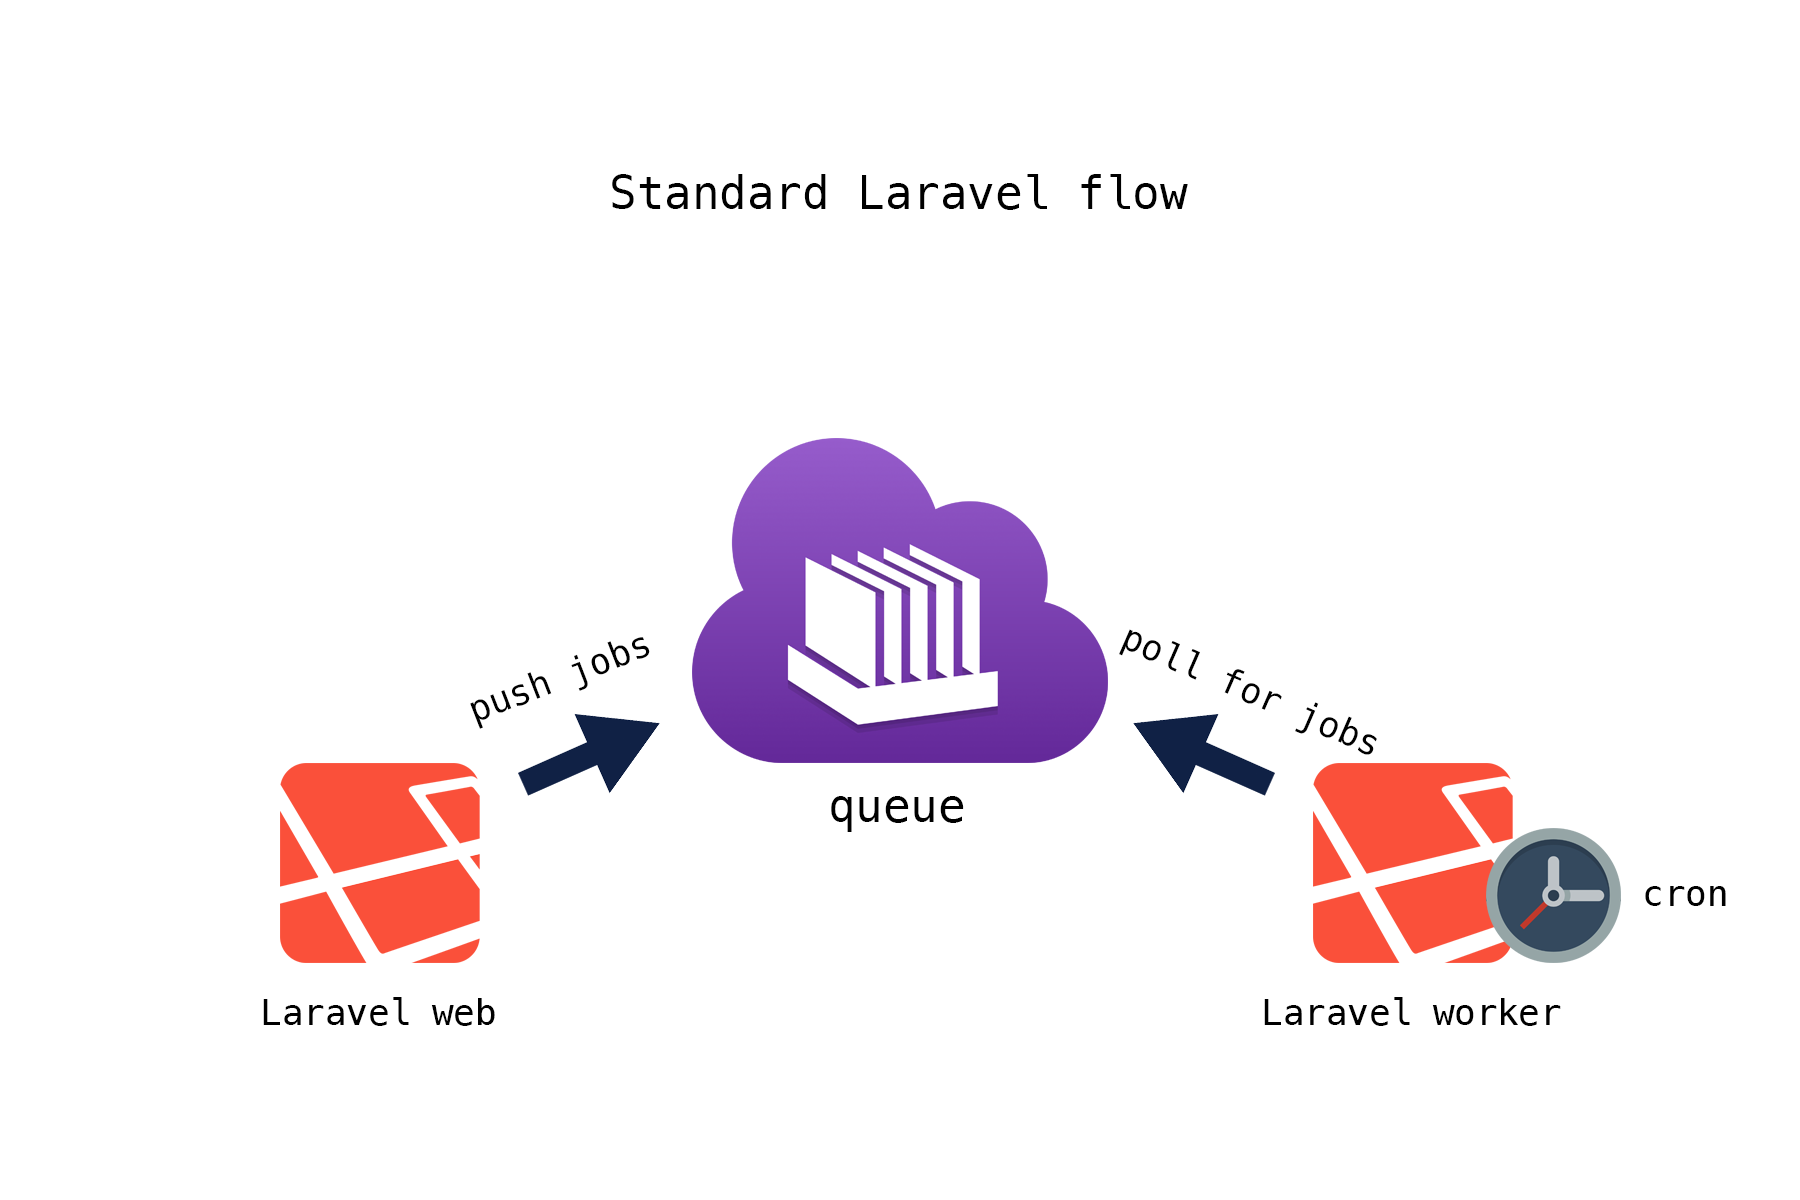
Laravel documentation recommends to use supervisor for queue workers and *IX cron for scheduled tasks. However, when deploying your application to AWS Elastic Beanstalk, neither option is available.
This package helps you run your Laravel (or Lumen) jobs in AWS worker environments.


You remember how Laravel documentation advised you to invoke the task scheduler? Right, by running php artisan schedule:run on regular basis, and to do that we had to add an entry to our cron file:
* * * * * php /path/to/artisan schedule:run >> /dev/null 2>&1
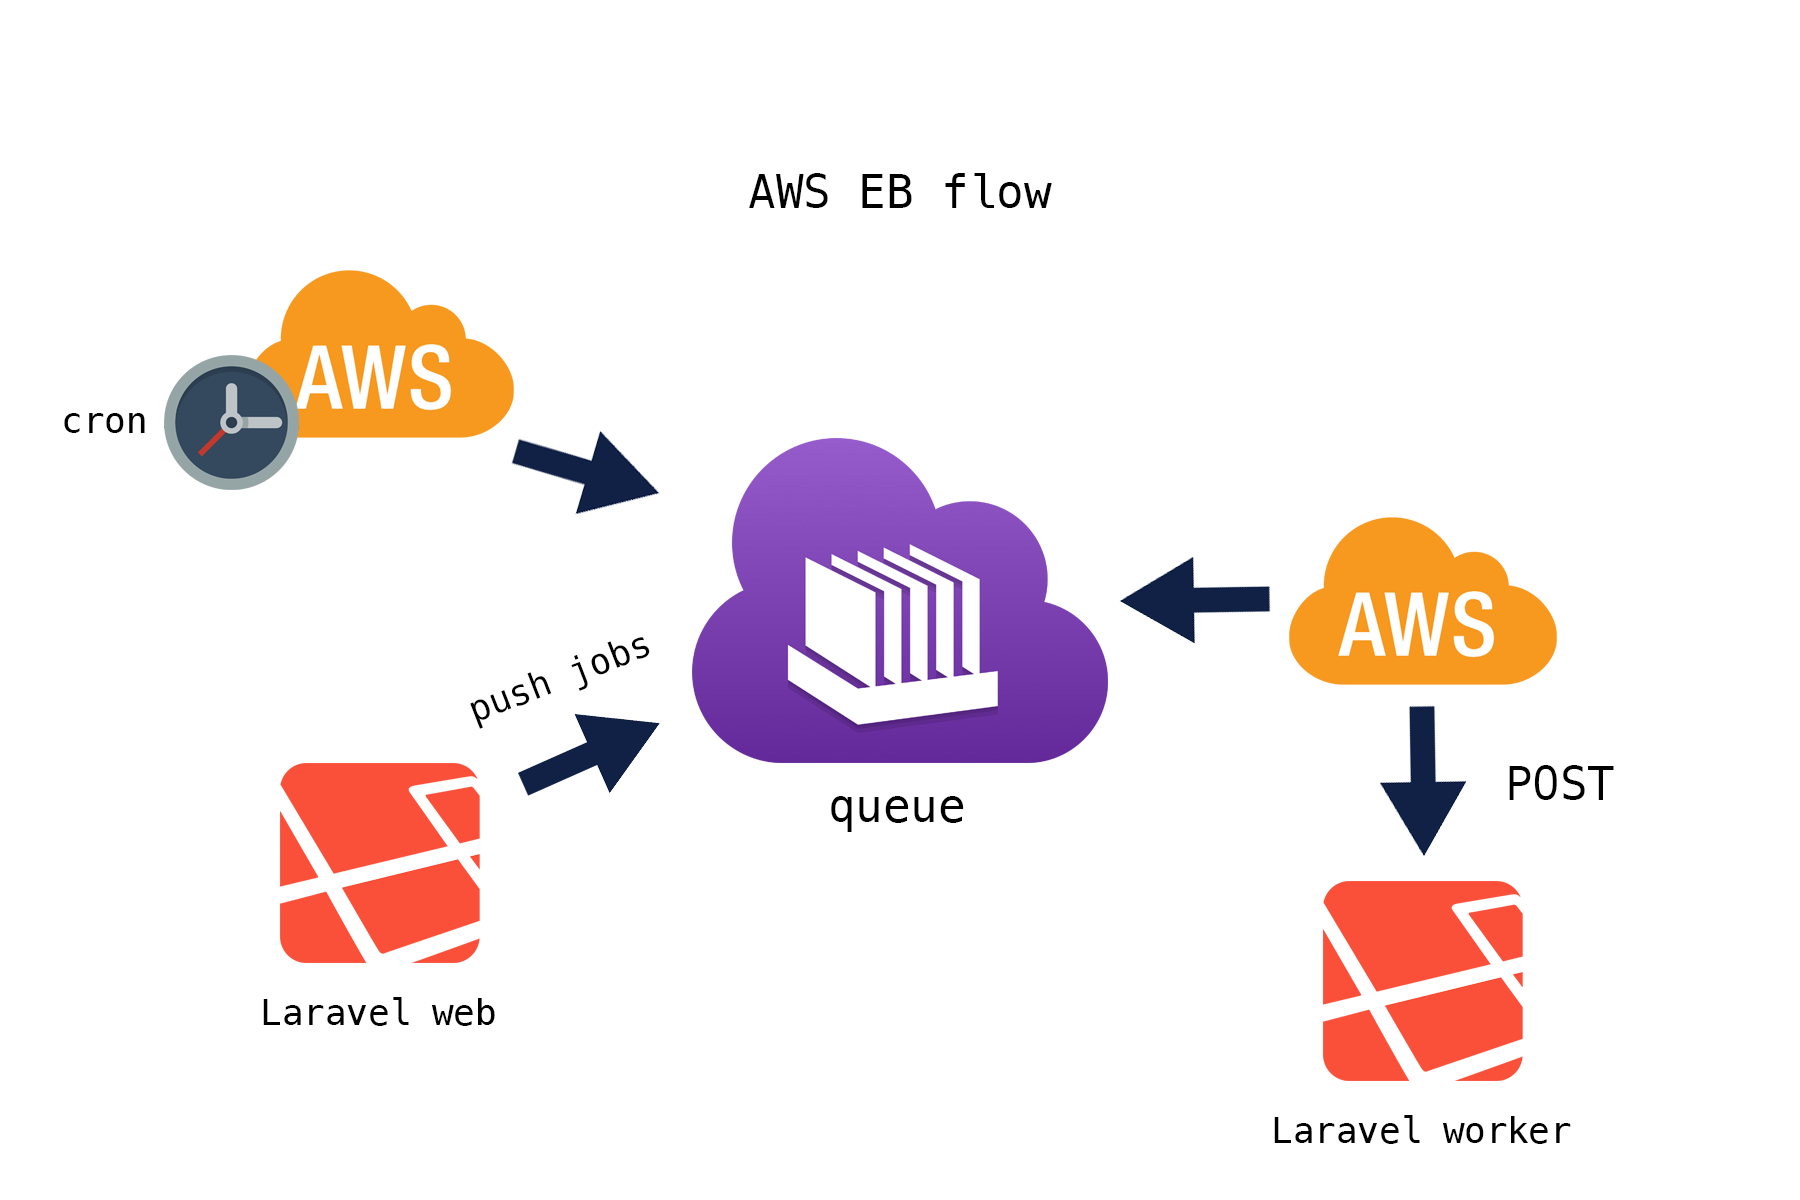
AWS doesn't allow you to run *IX commands or to add cron tasks directly. Instead, you have to make regular HTTP (POST, to be precise) requests to your worker endpoint.
Add cron.yaml to the root folder of your application (this can be a part of your repo or you could add this file right before deploying to EB - the important thing is that this file is present at the time of deployment):
version: 1
cron:
 - name: "schedule"
   url: "/worker/schedule"
   schedule: "* * * * *"
From now on, AWS will do POST /worker/schedule to your endpoint every minute - kind of the same effect we achieved when editing a UNIX cron file. The important difference here is that the worker environment still has to run a web process in order to execute scheduled tasks.
Your scheduled tasks should be defined in App\Console\Kernel::class - just where they normally live in Laravel, eg.:
protected function schedule(Schedule $schedule)
{
    $schedule->command('inspire')
              ->everyMinute();
}
Normally Laravel has to poll SQS for new messages, but in case of AWS Elastic Beanstalk messages will come to us – inside of POST requests from the AWS daemon.
Therefore, we will create jobs manually based on SQS payload that arrived, and pass that job to the framework's default worker. From this point, the job will be processed the way it's normally processed in Laravel. If it's processed successfully, our controller will return a 200 HTTP status and AWS daemon will delete the job from the queue. Again, we don't need to poll for jobs and we don't need to delete jobs - that's done by AWS in this case.
If you dispatch jobs from another instance of Laravel or if you are following Laravel's payload format {"job":"","data":""} you should be okay to go. If you want to receive custom format JSON messages, you may want to install
Laravel plain SQS package as well.
Every time you create a worker environment in AWS, you are forced to choose two SQS queues – either automatically generated ones or some of your existing queues. One of the queues will be for the jobs themselves, another one is for failed jobs – AWS calls this queue a dead letter queue.
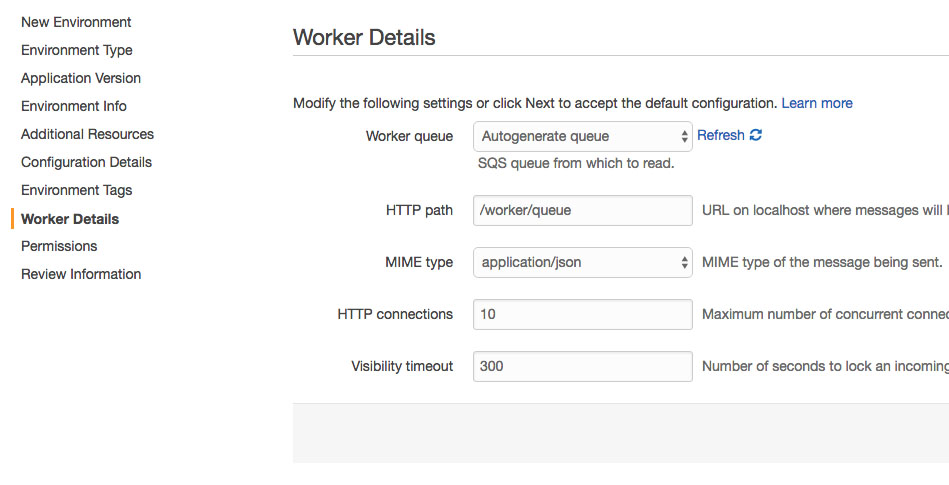
You can set your worker queues either during the environment launch or anytime later in the settings:

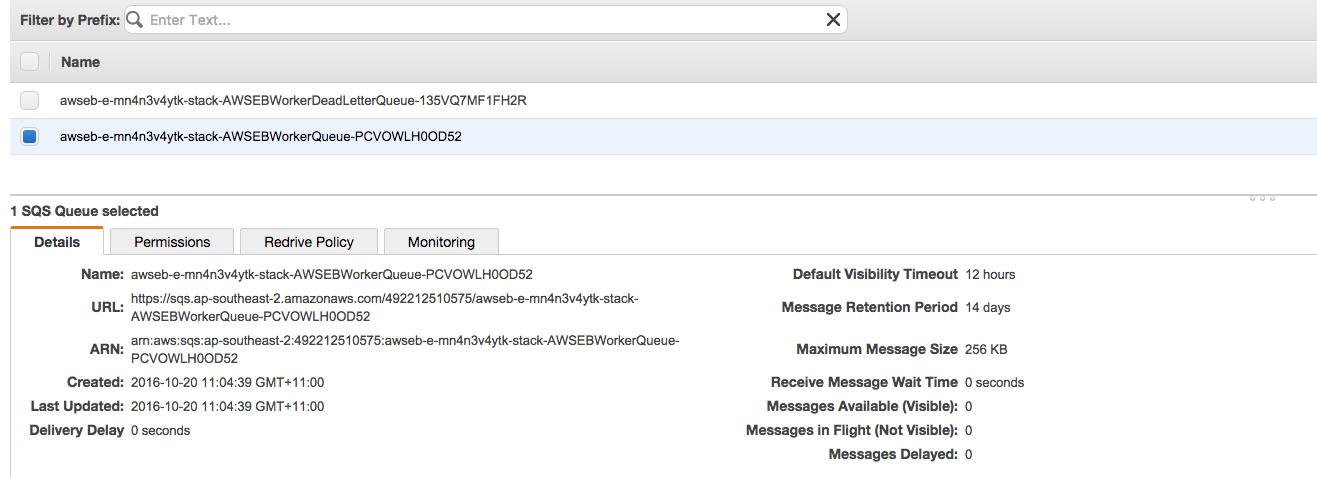
Don't forget to set the HTTP path to /worker/queue – this is where AWS will hit our application. If you chose to generate queues automatically, you can see their details later in SQS section of the AWS console:

You have to tell Laravel about this queue. First set your queue driver to SQS in .env file:
QUEUE_DRIVER=sqs
Then go to config/queue.php and copy/paste details from AWS console:
        ...
        'sqs' => [
            'driver' => 'sqs',
            'key' => 'your-public-key',
            'secret' => 'your-secret-key',
            'prefix' => 'https://sqs.us-east-1.amazonaws.com/your-account-id',
            'queue' => 'your-queue-name',
            'region' => 'us-east-1',
        ],
        ...
To generate key and secret go to Identity and Access Management in the AWS console. It's better to create a separate user that ONLY has access to SQS.
To install simply run:
composer require dusterio/laravel-aws-worker
Or add it to composer.json manually:
{
    "require": {
        "dusterio/laravel-aws-worker": "~0.1"
    }
}
// Add in your config/app.php

'providers' => [
    '...',
    'Dusterio\AwsWorker\Integrations\LaravelServiceProvider',
];
After adding service provider, you should be able to see two special routes that we added:
$ php artisan route:list
+--------+----------+-----------------+------+----------------------------------------------------------+------------+
| Domain | Method   | URI             | Name | Action                                                   | Middleware |
+--------+----------+-----------------+------+----------------------------------------------------------+------------+
|        | POST     | worker/queue    |      | Dusterio\AwsWorker\Controllers\WorkerController@queue    |            |
|        | POST     | worker/schedule |      | Dusterio\AwsWorker\Controllers\WorkerController@schedule |            |
+--------+----------+-----------------+------+----------------------------------------------------------+------------+
Environment variable REGISTER_WORKER_ROUTES is used to trigger binding of the two routes above. If you run the same application in both web and worker environments,
don't forget to set REGISTER_WORKER_ROUTES to false in your web environment. You don't want your regular users to be able to invoke scheduler or queue worker.
This variable is set to true by default at this moment.
So that's it - if you (or AWS) hits /worker/queue, Laravel will process one queue item (supplied in the POST). And if you hit /worker/schedule, we will run the scheduler (it's the same as to run php artisan schedule:run in shell).
// Add in your bootstrap/app.php
$app->register(Dusterio\AwsWorker\Integrations\LumenServiceProvider::class);
Please make sure that two special routes are not mounted behind a CSRF middleware. Our POSTs are not real web forms and CSRF is not necessary here. If you have a global CSRF middleware, add these routes to exceptions, or otherwise apply CSRF to specific routes or route groups.
If your job fails, we will throw a FailedJobException. If you want to customize error output – just customise your exception handler.
Note that your HTTP status code must be different from 200 in order for AWS to realize the job has failed.
Note that AWS cron doesn't promise 100% time accuracy. Since cron tasks share the same queue with other jobs, your scheduled tasks may be processed later than expected.
I wrote a blog post explaining how this actually works.