slimani/filament-media-manager
Filament Media Manager


A comprehensive media manager plugin for Filament v4 and v5.
Features
- Folder-based organization: Organize your media into hierarchical folders.
- Native Filament integration: Built specifically for Filament with support for forms, tables, and actions across both v4 and v5 versions.
- Smooth UI: Modern, responsive media browser with search and filtering capabilities.
- Hierarchical Folder Navigation: Browse and organize media using a powerful tree selection interface, thanks to
filament-select-tree. - Taggable media: Add tags to your files for easier searching and filtering.
- Support for multiple disks: Configure which disk to use for storage per field or globally.
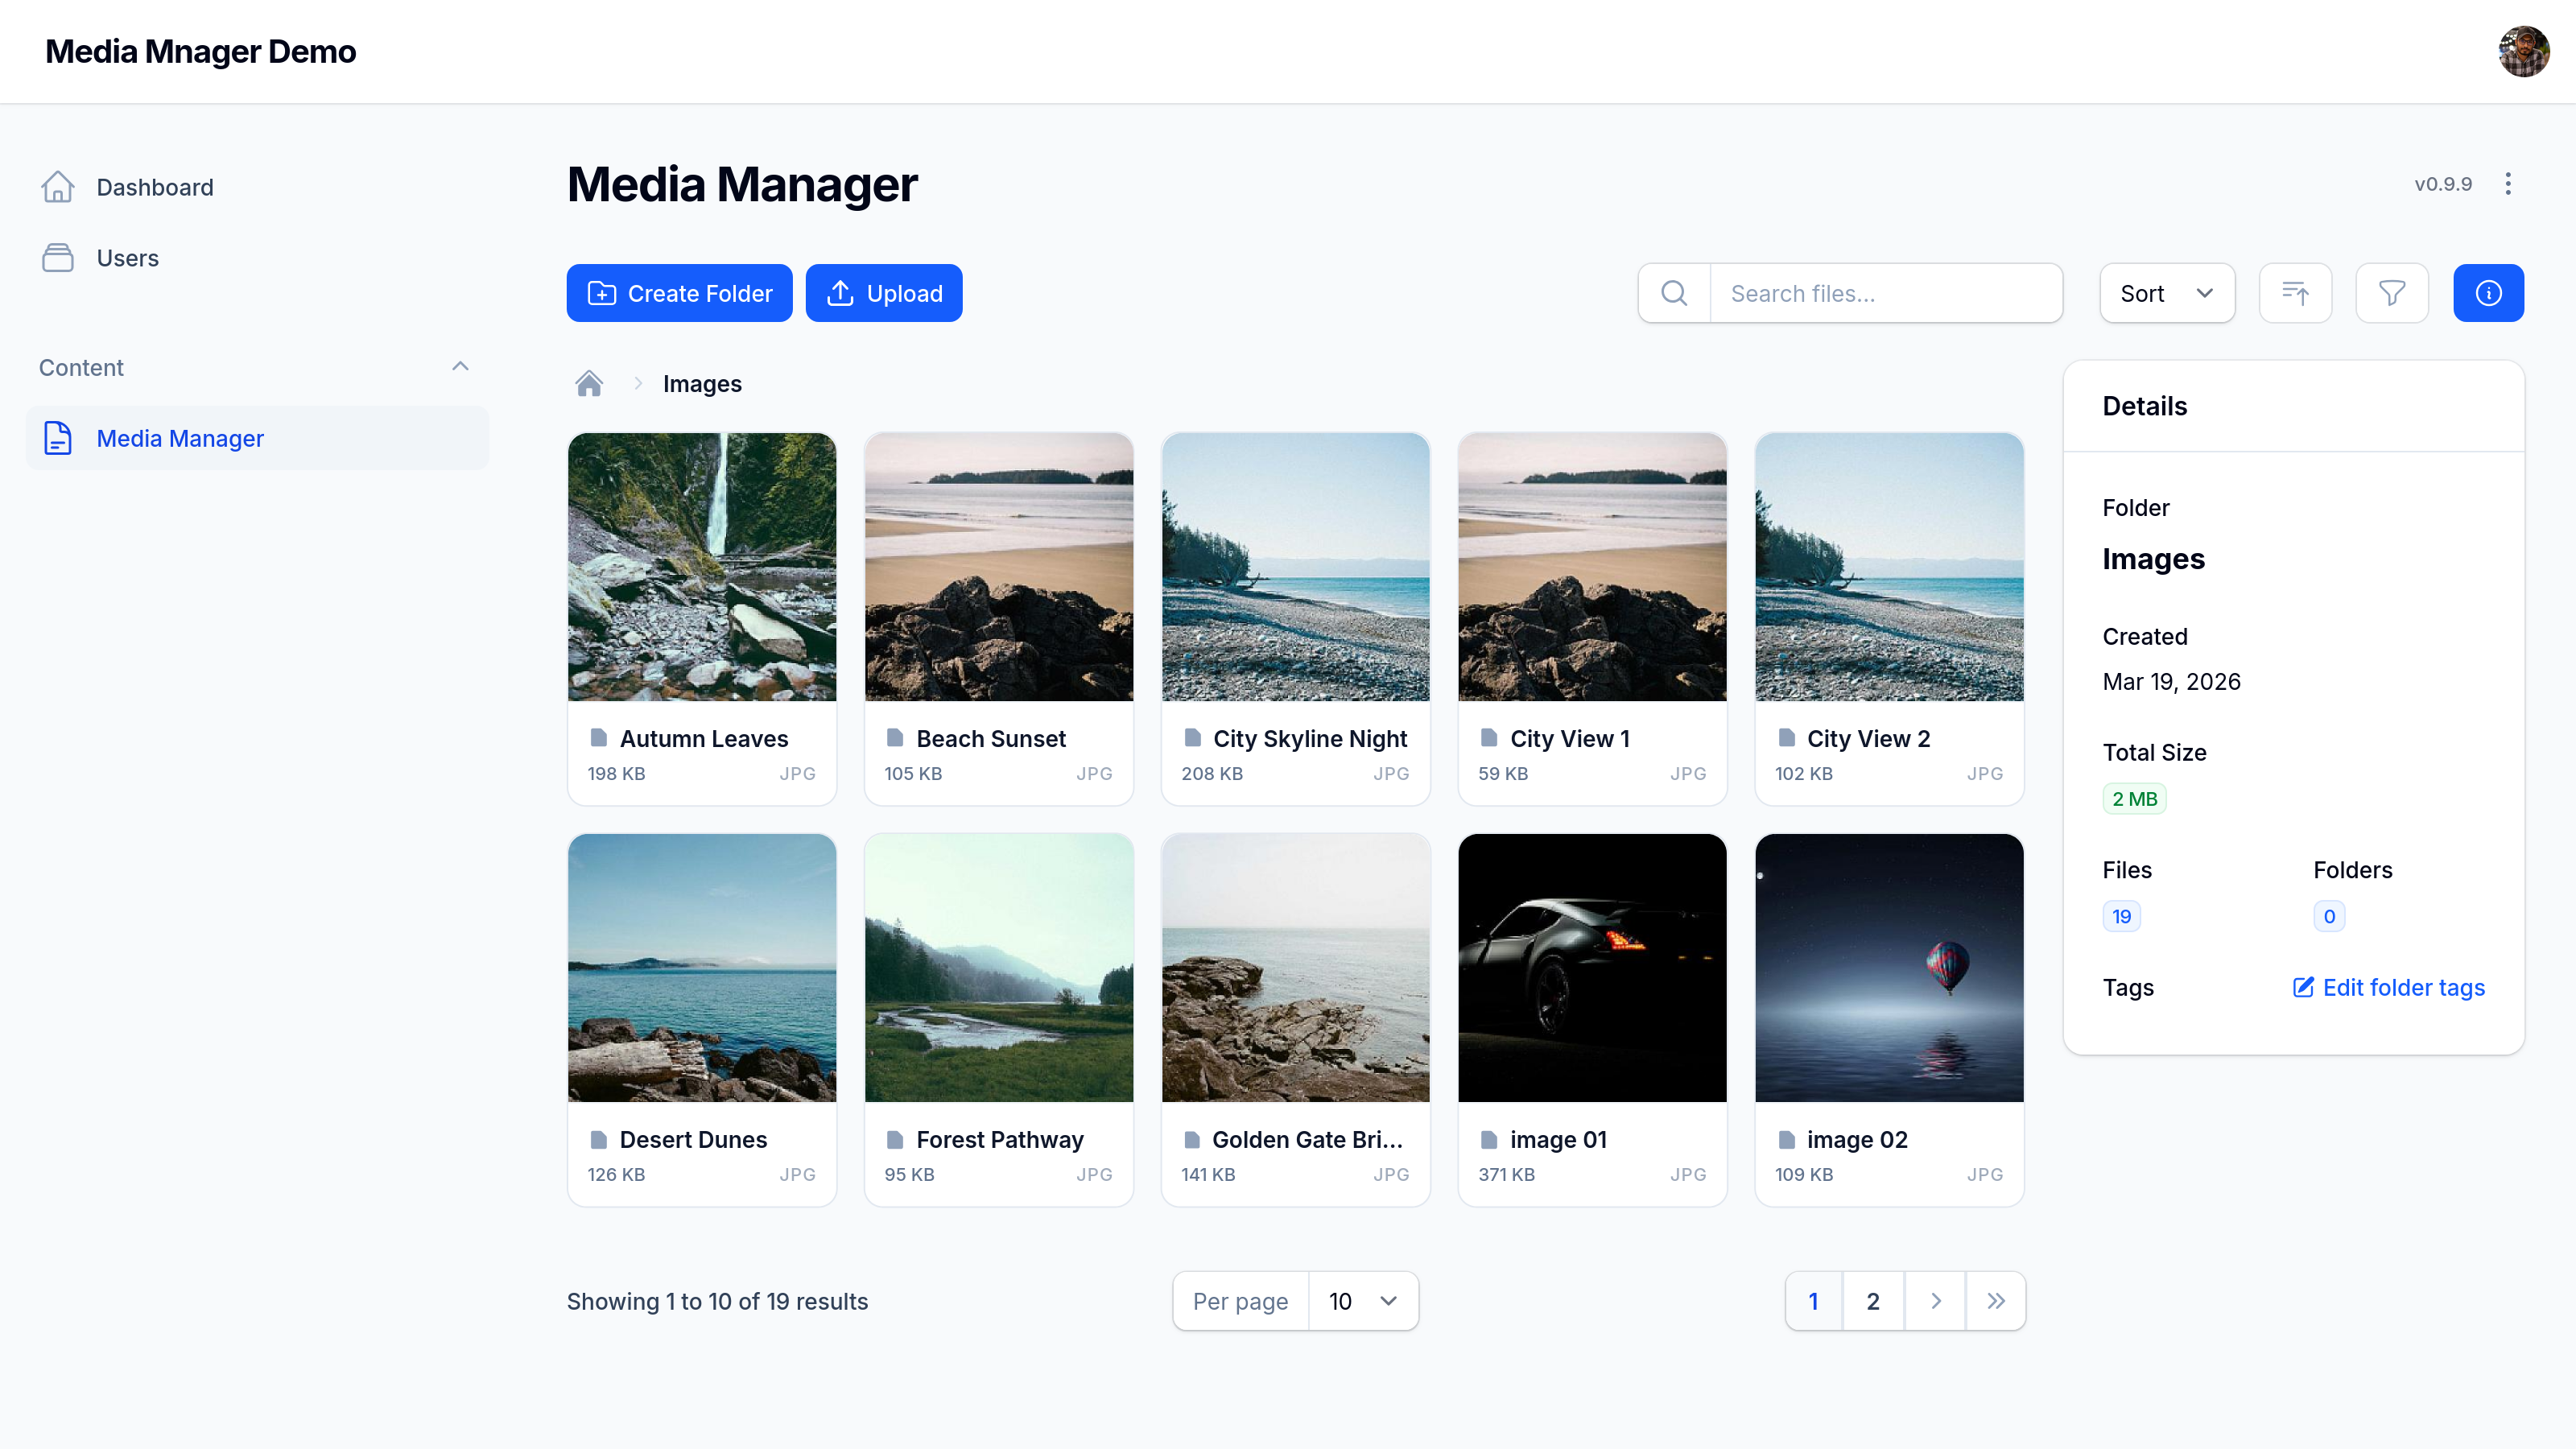
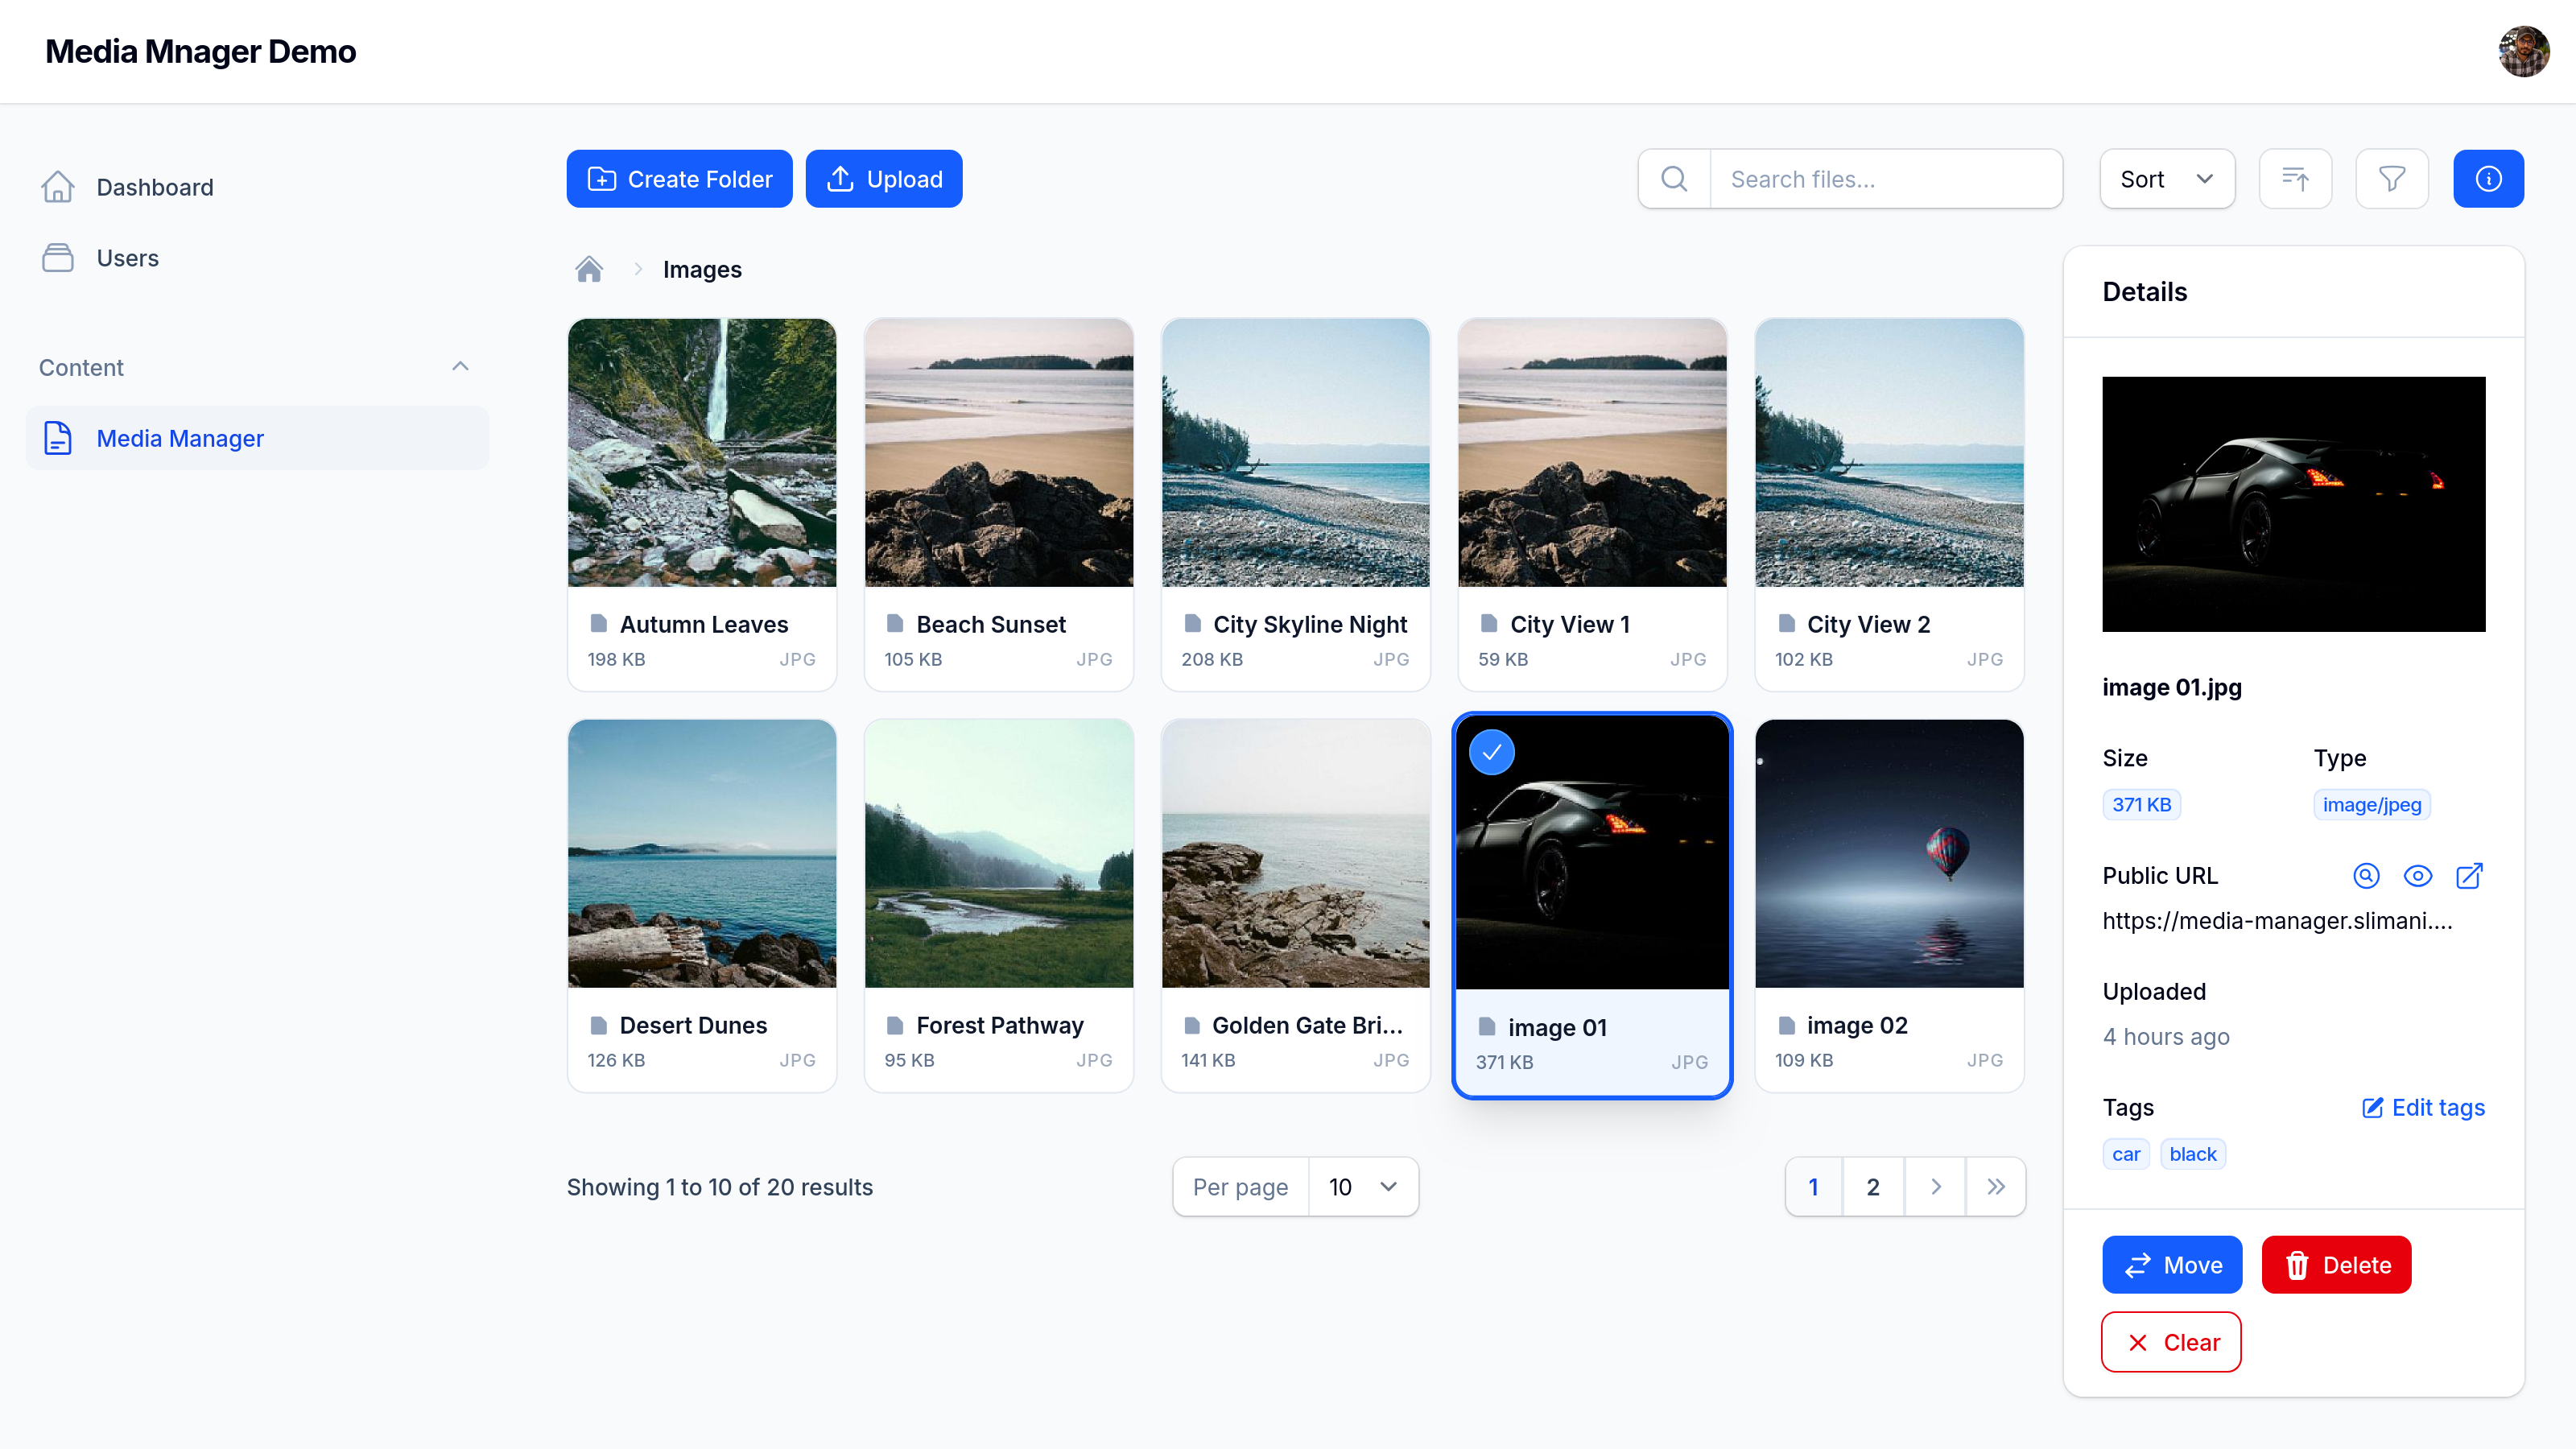
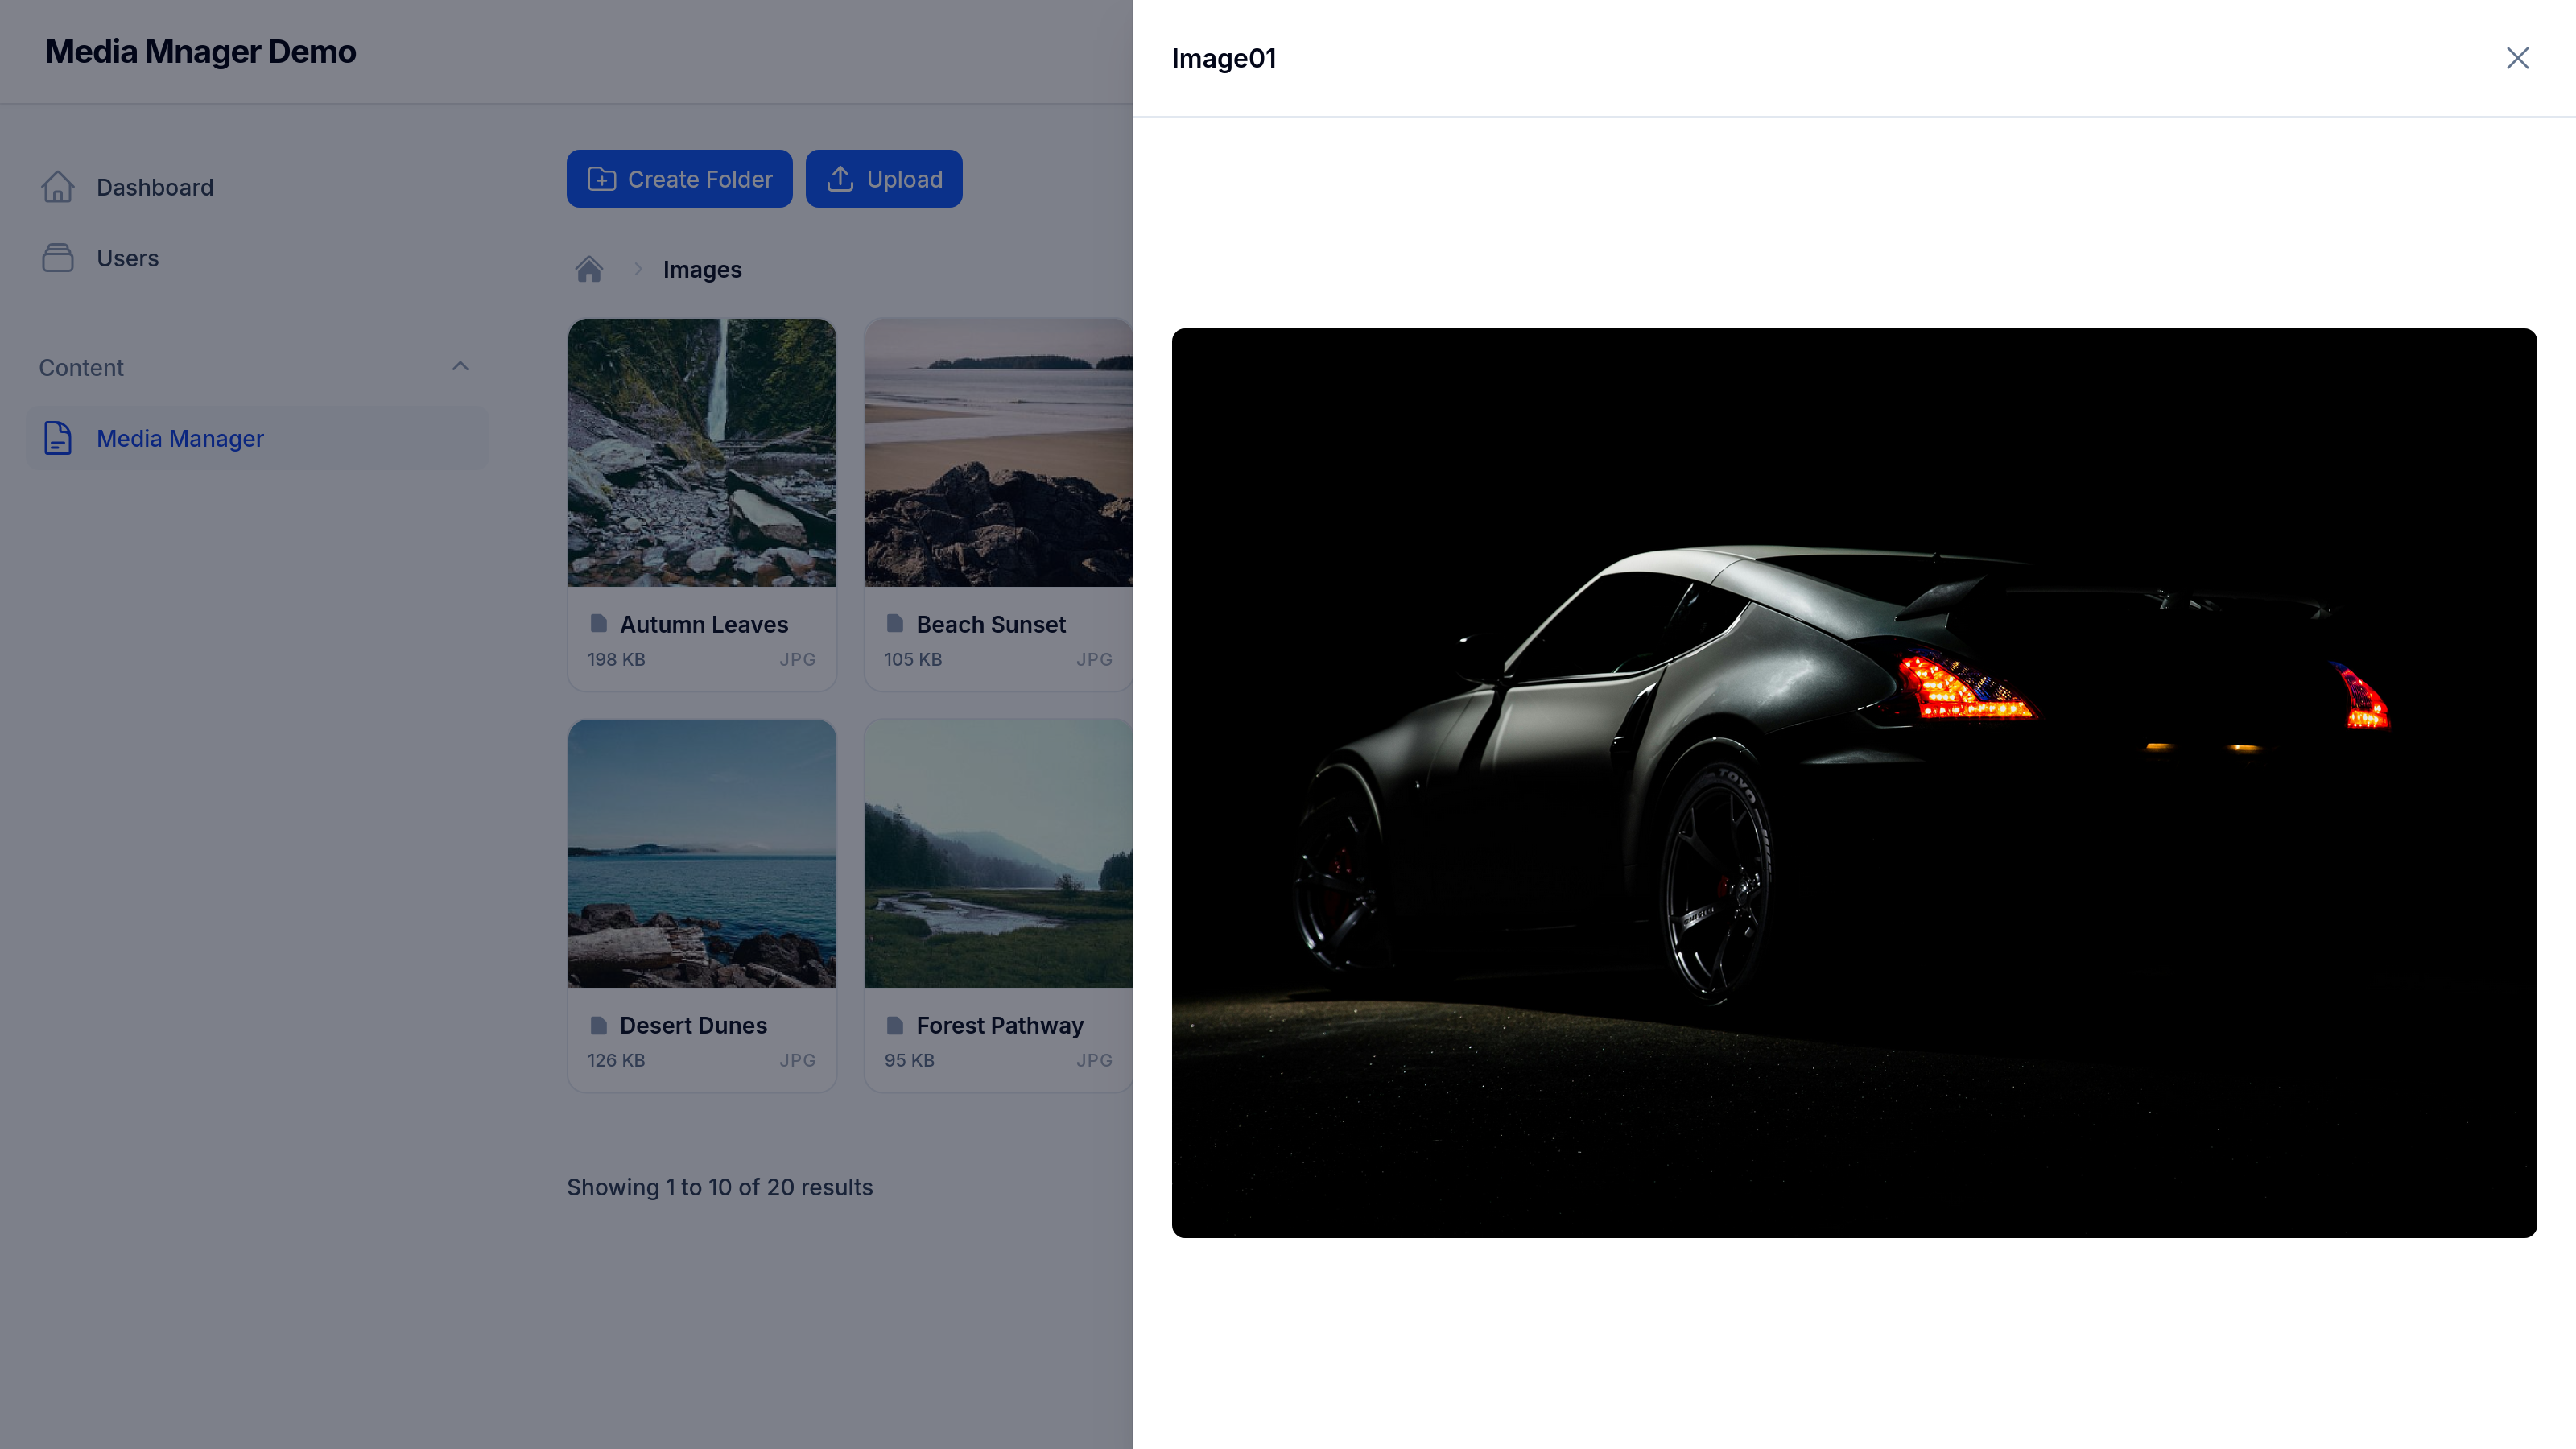
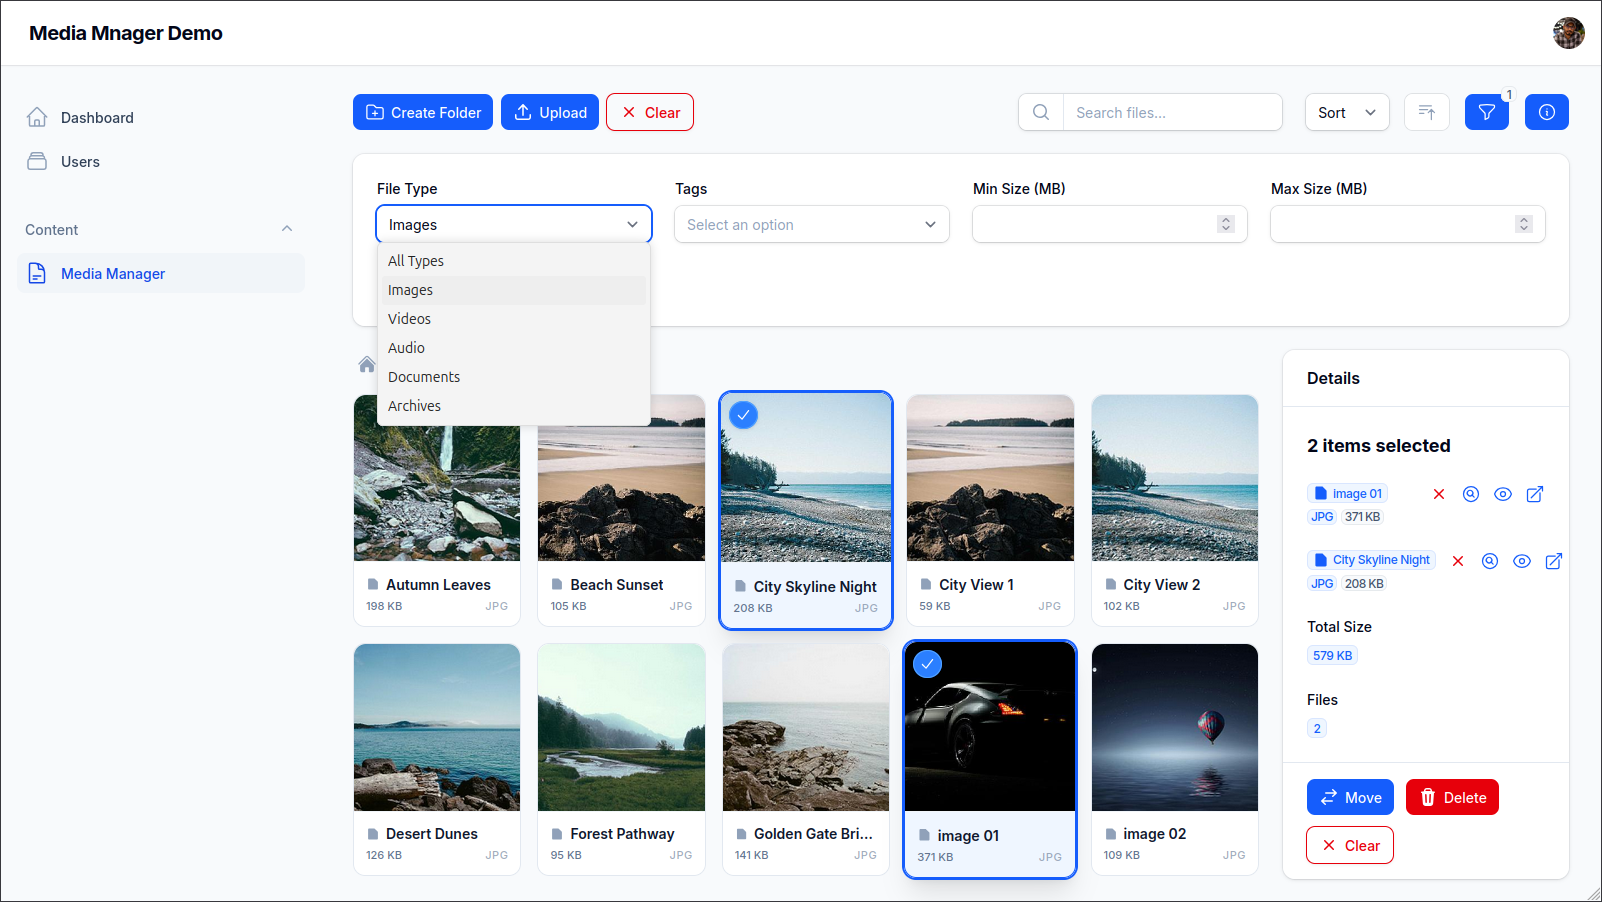
Screenshots
Media Manager Overview
File Upload

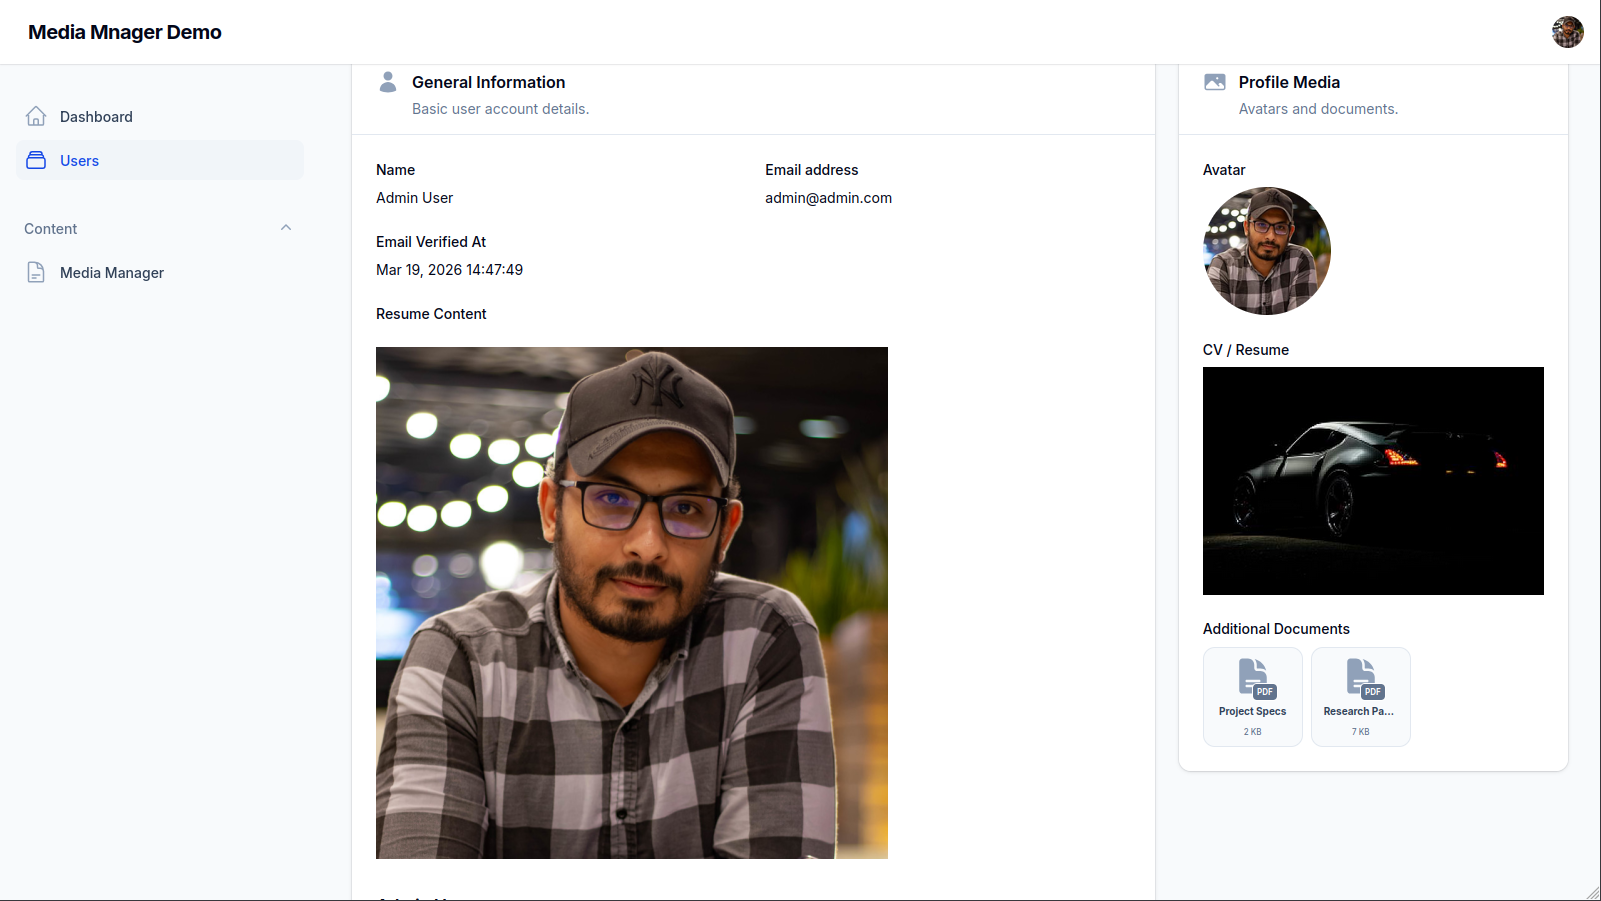
File Details
File Preview
Filter, Search and Sort (with Multiple selectin and Actions)
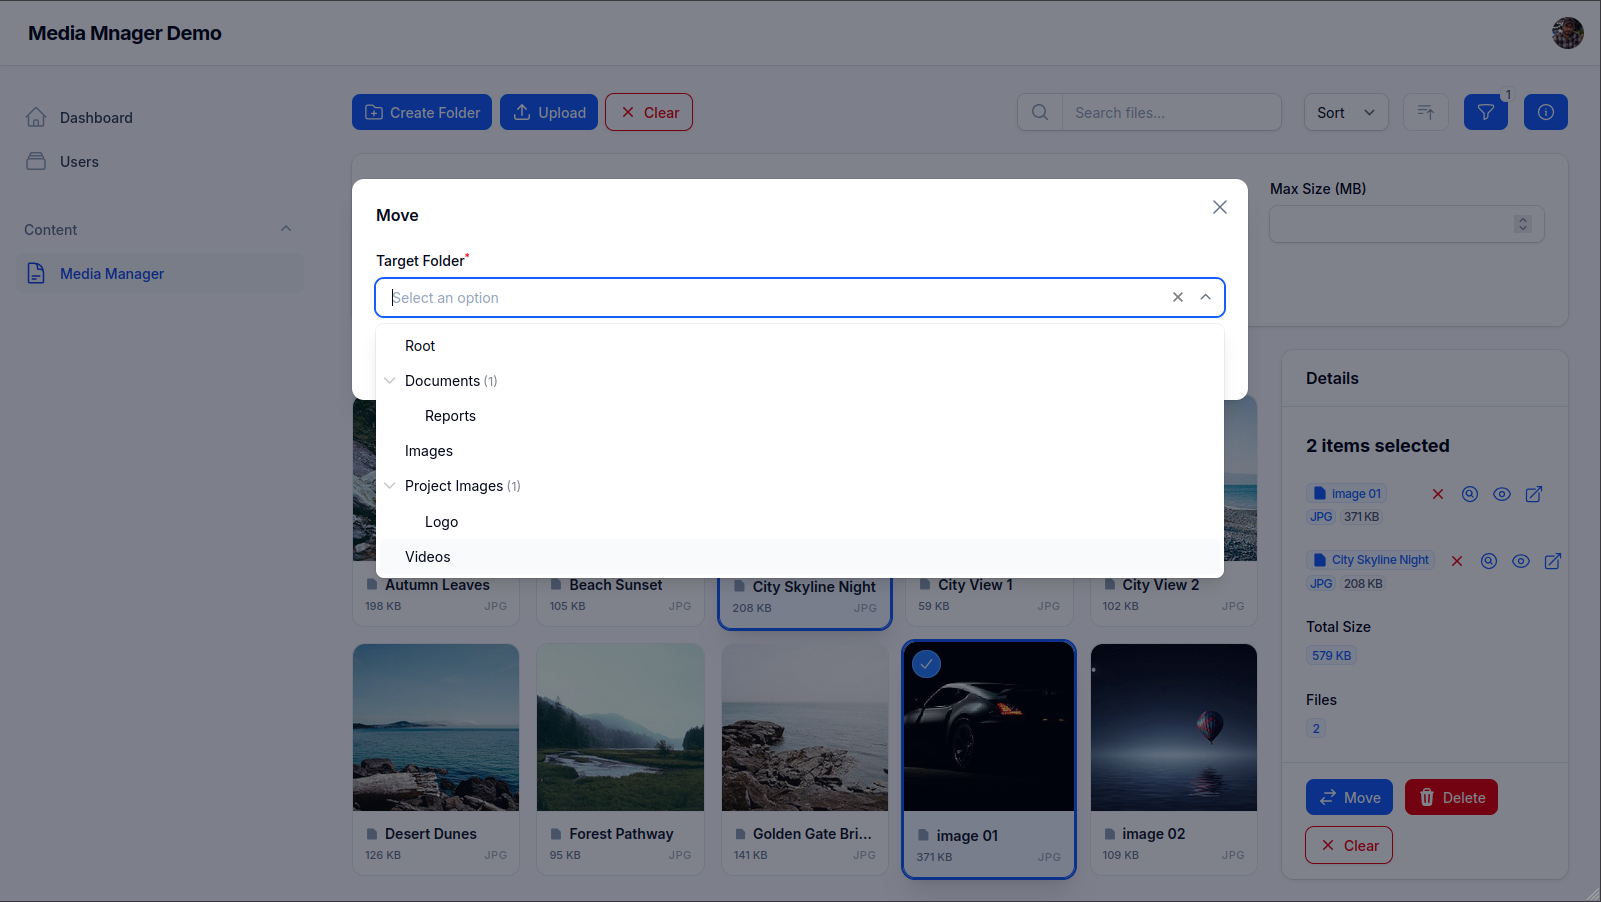
Move Action Dialoge
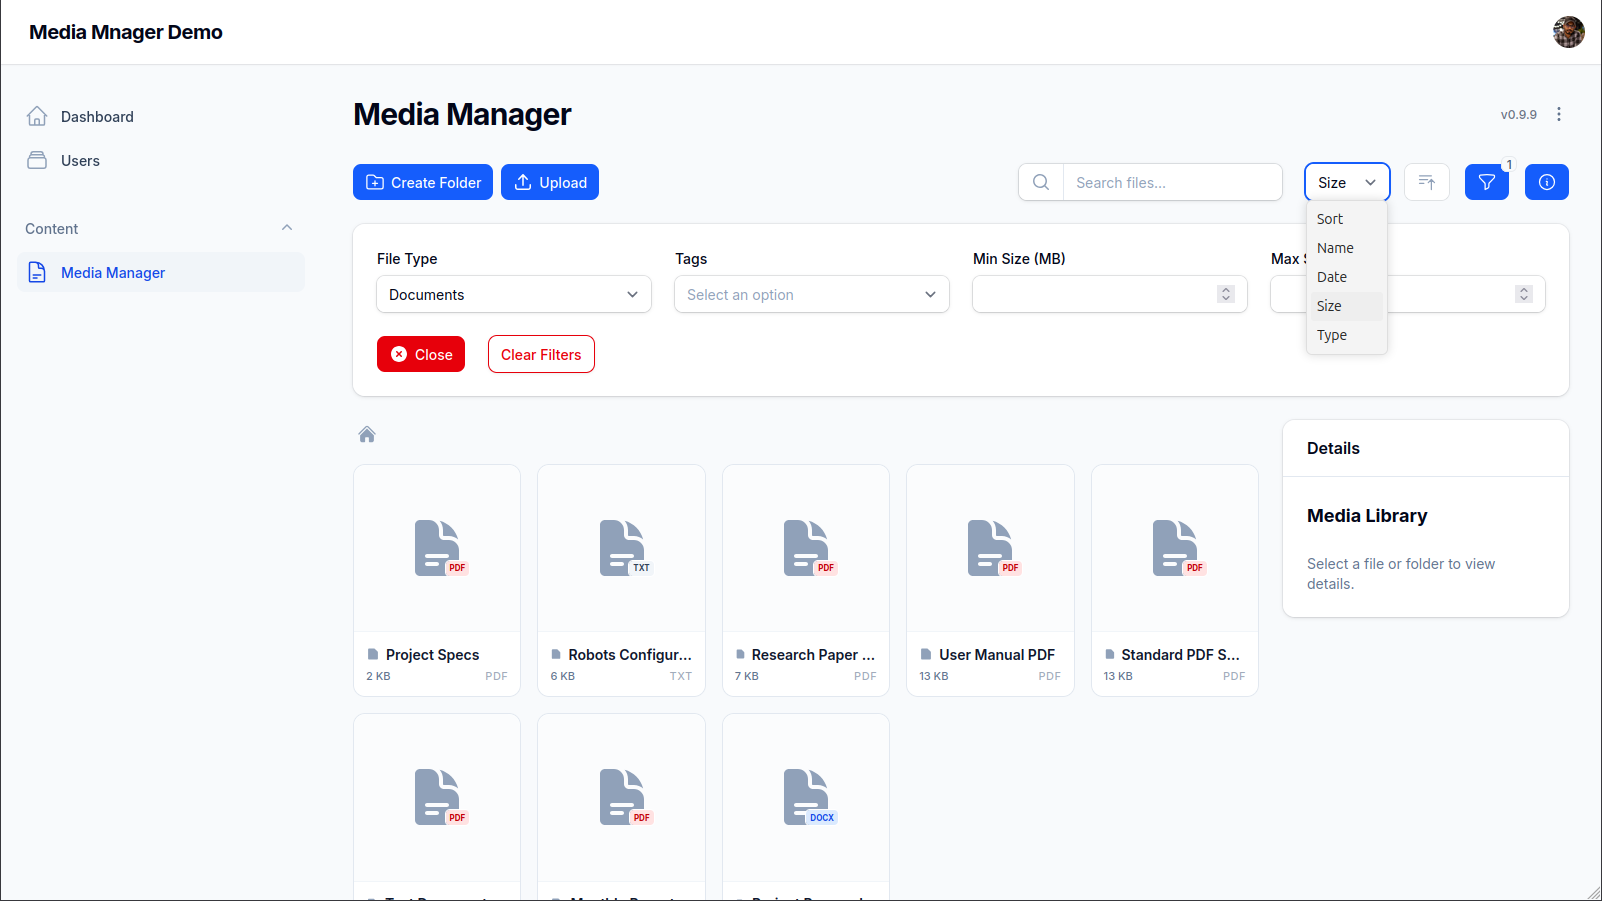
Filtering by Type (Document) and Sorting By size
Rich Text Integration, Media Picker, MediaEntries
Media Picker (in Action)

Installation
You can install the package via composer:
composer require slimani/filament-media-manager
# Publish Media Manager migrations
php artisan vendor:publish --tag="media-manager-migrations"

# Publish Spatie MediaLibrary migrations (if not already published)
php artisan vendor:publish --provider="Spatie\MediaLibrary\MediaLibraryServiceProvider" --tag="medialibrary-migrations"

# Run migrations
php artisan migrate
You can publish the config file with:
php artisan vendor:publish --tag="media-manager-config"
Styling
If you are using a Custom Filament Theme, you must include both the plugin's pre-defined styles and allow Tailwind to scan your components for utility classes.
Add the following lines to your theme.css file:
@import '../../../../vendor/slimani/filament-media-manager/resources/css/media-manager.css';

@source '../../../../vendor/slimani/filament-media-manager/resources/**/*';
Why both?
- @import: Loads the custom component styles (like the media grid and picker layouts) that are unique to this plugin.
- @source: Allows Tailwind to scan the plugin's Blade files and generate any standard utility classes (like
p-4,flex, etc.) that are used in the UI.
Usage
Plugin Registration
Register the plugin in your Panel Provider:
use Slimani\MediaManager\MediaManagerPlugin;

public function panel(Panel $panel): Panel
{
    return $panel
        ->plugin(MediaManagerPlugin::make());
}
Prepare Model
To use the media manager with your models, add the InteractsWithMediaFiles trait. This is required for relationships and picker functionality.
1. Prepare your Migration
- For single-file relationships (like
avatar_idorcv_id), you need to add the foreign key columns to your model's migration:
Schema::table('users', function (Blueprint $table) {
    $table->foreignId('avatar_id')->nullable()->constrained('media_files')->nullOnDelete();
    $table->foreignId('cv_id')->nullable()->constrained('media_files')->nullOnDelete();
});
- For multiple/polymorphic relationships (using
$this->mediaFiles()), no migration is required. These relationships utilize the built-inmedia_attachmentstable included in the package migrations.
2. Prepare your Model
Add the trait and define your specific relationships. Don't forget to add the foreign keys to your $fillable array.
namespace App\Models;

use Illuminate\Database\Eloquent\Model;
use Slimani\MediaManager\Concerns\InteractsWithMediaFiles;

class User extends Model
{
    use InteractsWithMediaFiles;

    protected $fillable = [
        'name',
        'email',
        'avatar_id',
        'cv_id',
    ];

    public function avatar(): \Illuminate\Database\Eloquent\Relations\BelongsTo
    {
        return $this->mediaFile('avatar_id');
    }

    public function cv(): \Illuminate\Database\Eloquent\Relations\BelongsTo
    {
        return $this->mediaFile('cv_id');
    }

    /**
     * Optional: Define custom collection relationships
     */
    public function documents(): \Illuminate\Database\Eloquent\Relations\MorphToMany
    {
        return $this->mediaFiles('documents');
    }
}
Media Picker Field
Use the MediaPicker field in your Filament forms. It uses the "Prepare Model" setup to handle file selection via a modal.
use Slimani\MediaManager\Form\MediaPicker;
use Filament\Forms\Form;

public static function form(Form $form): Form
{
    return $form
        ->schema([
            // Single file selection with specific names (requires InteractsWithMediaFiles in Model)
            MediaPicker::make('avatar_id')
                ->relationship('avatar')
                ->label('User Avatar')
                ->required(),

            MediaPicker::make('cv_id')
                ->relationship('cv')
                ->label('User CV'),

            // Multiple file selection (requires MorphToMany relationship in Model)
            MediaPicker::make('documents')
                ->relationship('documents')
                ->multiple()
                ->label('User Documents'),
        ]);
}
Media Column
Display media in your Filament tables using the MediaColumn:
use Slimani\MediaManager\Tables\Columns\MediaColumn;

MediaColumn::make('avatar')
    ->circular()
    ->stacked()
Media Infolist Entries
The package provides two types of infolist entries: MediaImageEntry for image-specific features and MediaFileEntry for general file types with preview actions.
Media Image Entry
Use MediaImageEntry when you want to display image thumbnails with native Filament ImageEntry features (circular, stacked, etc.) and media manager conversion support.
use Slimani\MediaManager\Infolists\Components\MediaImageEntry;

MediaImageEntry::make('avatar')
    ->label('User Avatar')
    ->conversion('thumb') // Optional, defaults to 'thumb'
    ->circular() // Native Filament feature
    ->width(100)
Media File Entry
Use MediaFileEntry for a generic media display that includes an automatic "Open Preview" action, ideal for documents, videos, and mixed media.
use Slimani\MediaManager\Infolists\Components\MediaFileEntry;

MediaFileEntry::make('cv')
    ->label('User CV')
Both components support the media preview action that opens files in a slide-over.
URL Generation and Disk Visibility
File::getUrl() returns clean URLs for disks with visibility => 'public', and temporary signed URLs for other disks when supported. For conversions, it also respects conversions_disk when set. See docs/url-generation.md for configuration details and examples.
Rich Text Editor Integration
The Media Manager integrates deeply with Filament's RichEditor, allowing you to insert images directly from your media library while keeping generated media URLs aligned with your disk visibility settings.
1. Prepare your Model
Implement the HasRichContent interface and use the InteractsWithRichContent trait. Then, use setUpRichContent to register the media manager configuration for your field.
use Filament\Forms\Components\RichEditor\Models\Concerns\InteractsWithRichContent;
use Filament\Forms\Components\RichEditor\Models\Contracts\HasRichContent;
use Slimani\MediaManager\Form\RichEditor\MediaManagerRichContentPlugin;

class User extends Authenticatable implements HasRichContent
{
    use InteractsWithRichContent;

    public function setUpRichContent(): void
    {
        $this->registerRichContent('resume')
            ->plugins([
                MediaManagerRichContentPlugin::make()
                    ->collection('preview')
                    ->directory('User/Resumes'),
            ]);
    }
}
Note: Implementing
HasFileAttachmentProviderin the plugin means that Filament automatically resolves the correct provider. You no longer need to callfileAttachmentProvider()manually on the attribute or renderer.
2. Use in Forms
Add the MediaManagerRichContentPlugin to your RichEditor component. This adds a "Media Library" button to the toolbar.
use Filament\Forms\Components\RichEditor;
use Slimani\MediaManager\Form\RichEditor\MediaManagerRichContentPlugin;

RichEditor::make('resume')
    ->plugins([
        MediaManagerRichContentPlugin::make()
            ->acceptedFileTypes(["image/*"]), // Optional: Limit to images only
    ])
3. Use in Infolists (Dynamic Rendering)
To ensure that images in your rich text always use the correct URLs at render time, use the renderRichContent method in your Infolist. This is especially important when your media uses private disks or temporary signed URLs.
use Filament\Infolists\Components\TextEntry;

TextEntry::make('resume')
    ->html()
    ->state(fn ($record) => $record->renderRichContent('resume'))
This method parses the stored HTML and resolves each image ID into a fresh URL on the fly, solving the "expired link" problem entirely.
Plugin Customization
You can customize the Media Manager directly in your Panel Provider:
use Slimani\MediaManager\MediaManagerPlugin;

MediaManagerPlugin::make()
    ->navigationGroup('System')
    ->navigationLabel('Assets')
    ->navigationIcon('heroicon-o-folder')
    ->navigationSort(5)
    ->shouldRegisterNavigation(fn () => auth()->user()->isAdmin())
    ->headerWidgets([
        MyCustomWidget::class,
    ])
    ->footerWidgets([
        AnotherWidget::class,
    ])
    ->header(view('custom.header'))
    ->footer(view('custom.footer'))
    ->withVideoThumbnails() // Optional: Enable video thumbnails (requires FFMPEG)
Model Customization & Table Prefix Support
The Media Manager is fully compatible with database table prefixes and allows you to customize the underlying models for File, Folder, Tag, and MediaAttachment.
Table Prefix Support
All raw SQL queries within the package (such as recursive folder calculations) use dynamic table names retrieved from your models. This ensures that if you define a prefix in your database.php configuration, the package will automatically respect it.
Custom Model Classes
If you need to add custom logic, relationships, or traits to the internal models, you can swap them out in the plugin registration:
use App\Models\CustomFile;
use App\Models\CustomFolder;
use Slimani\MediaManager\MediaManagerPlugin;

MediaManagerPlugin::make()
    ->fileModel(CustomFile::class)
    ->folderModel(CustomFolder::class)
    ->tagModel(CustomTag::class)
    ->attachmentModel(CustomMediaAttachment::class)
Note: Your custom models should typically extend the base models provided by the package to ensure all core functionality remains intact.
Video Thumbnails
Thumbnail generation for videos is handled natively by the underlying Spatie MediaLibrary when FFMPEG and FFProbe are installed on your server.
To use this feature, you must install the FFMPEG PHP dependency:
composer require php-ffmpeg/php-ffmpeg
For more information on video processing requirements, please refer to the Spatie MediaLibrary Documentation.
Media Library Conversions
You can customize or add media conversions from your application's AppServiceProvider or a dedicated Service Provider. Default conversions (thumb and preview) are registered first, and your callback can override them or add new ones.
use Slimani\MediaManager\Models\File;
use Spatie\MediaLibrary\MediaCollections\Models\Media;

public function boot(): void
{
    File::registerMediaConversionsUsing(function (File $file, ?Media $media = null) {
        // Override default 'thumb' (300x300)
        $file->addMediaConversion('thumb')
            ->width(150)
            ->height(150)
            ->nonQueued();

        // Add a new custom conversion
        $file->addMediaConversion('square')
            ->width(500)
            ->height(500)
            ->nonQueued();

        // Default 'preview' (800x800) is kept if not overridden
    });
}
Using Conversions in Components
After defining your conversions, you can specify which one to use in your components using the conversion() method. This controls which conversion is used for the table thumbnail, infolist image, or form picker preview.
use Slimani\MediaManager\Tables\Columns\MediaColumn;
use Slimani\MediaManager\Infolists\Components\MediaImageEntry;
use Slimani\MediaManager\Form\MediaPicker;

// In Tables
MediaColumn::make('avatar')
    ->conversion('thumb')

// In Infolists
MediaImageEntry::make('avatar')
    ->conversion('preview')

MediaFileEntry::make('cv')
    ->conversion('thumb')

// In Forms (controls the picker's file preview)
MediaPicker::make('avatar_id')
    ->conversion('thumb')
All components default to the thumb conversion if none is specified.
Testing & Support
Seeders Example
To populate your media manager with initial data, you can use a seeder. Here is an example of how to set up folders and files:
use Slimani\MediaManager\Models\Folder;
use Slimani\MediaManager\Models\File;

public function run(): void
{
    $images = Folder::create(['name' => 'Project Images']);
    $docs = Folder::create(['name' => 'Documents']);

    // here should be the code if you have real files
    // for now we will use dummy data

    $banner = File::create([
        'name' => 'Main Banner',
        'folder_id' => $images->id,
        'size' => 1024,
        'extension' => 'jpg',
        'mime_type' => 'image/jpeg',
        'uploaded_by_user_id' => 1,
    ]);

    // Attach actual media using Spatie MediaLibrary
    $banner->addMediaFromUrl('https://picsum.photos/1200/800')
        ->toMediaCollection('default');
}
Running Tests
composer test
Changelog
Please see CHANGELOG for more information on what has changed recently.
Contributing
Please see CONTRIBUTING for details.
Security Vulnerabilities
Please review our security policy on how to report security vulnerabilities.
Credits
License
The MIT License (MIT). Please see License File for more information.